Unlock the Secrets to the Best Moist Chocolate Spider Cake
Halloween conjures images of costumes, spooky decorations, and, most importantly, delicious treats. While countless desserts vie for attention, one stands out as both dramatically festive and irresistibly decadent: the chocolate spider layer cake. Far from being just another sugary confection, this isn't merely a cake; it's a culinary masterpiece that promises rich, fudgy chocolate layers, silky smooth ganache, and mesmerizing marshmallow webs, all crowned with a creepy-crawly spider. It's the ultimate showstopper that tastes as good as it looks, melting in your mouth with every perfectly balanced bite.
Imagine a dessert that combines the deep, comforting flavor of chocolate with a playful, spooky aesthetic. This cake achieves precisely that, proving that Halloween treats can be both gourmet and ghastly. Whether you're a seasoned baker or a curious beginner, the secrets to achieving this bakery-quality delight at home are surprisingly within reach. It's a dessert that guarantees to be the centerpiece of any Halloween gathering, sparking conversations and delighting palates with its unique blend of textures and intense chocolate flavor.
The Allure of the Chocolate Spider Layer Cake: More Than Just a Treat
What makes the chocolate spider layer cake so utterly compelling? It’s a symphony of elements working in perfect harmony. Each component, from the base cake to the intricate decorations, plays a crucial role in creating an experience that is both spooky and sophisticated. Unlike many holiday-themed desserts that prioritize novelty over taste, this cake excels in both departments. The layers are profoundly rich yet surprisingly airy, offering an indulgent experience without feeling overly heavy.
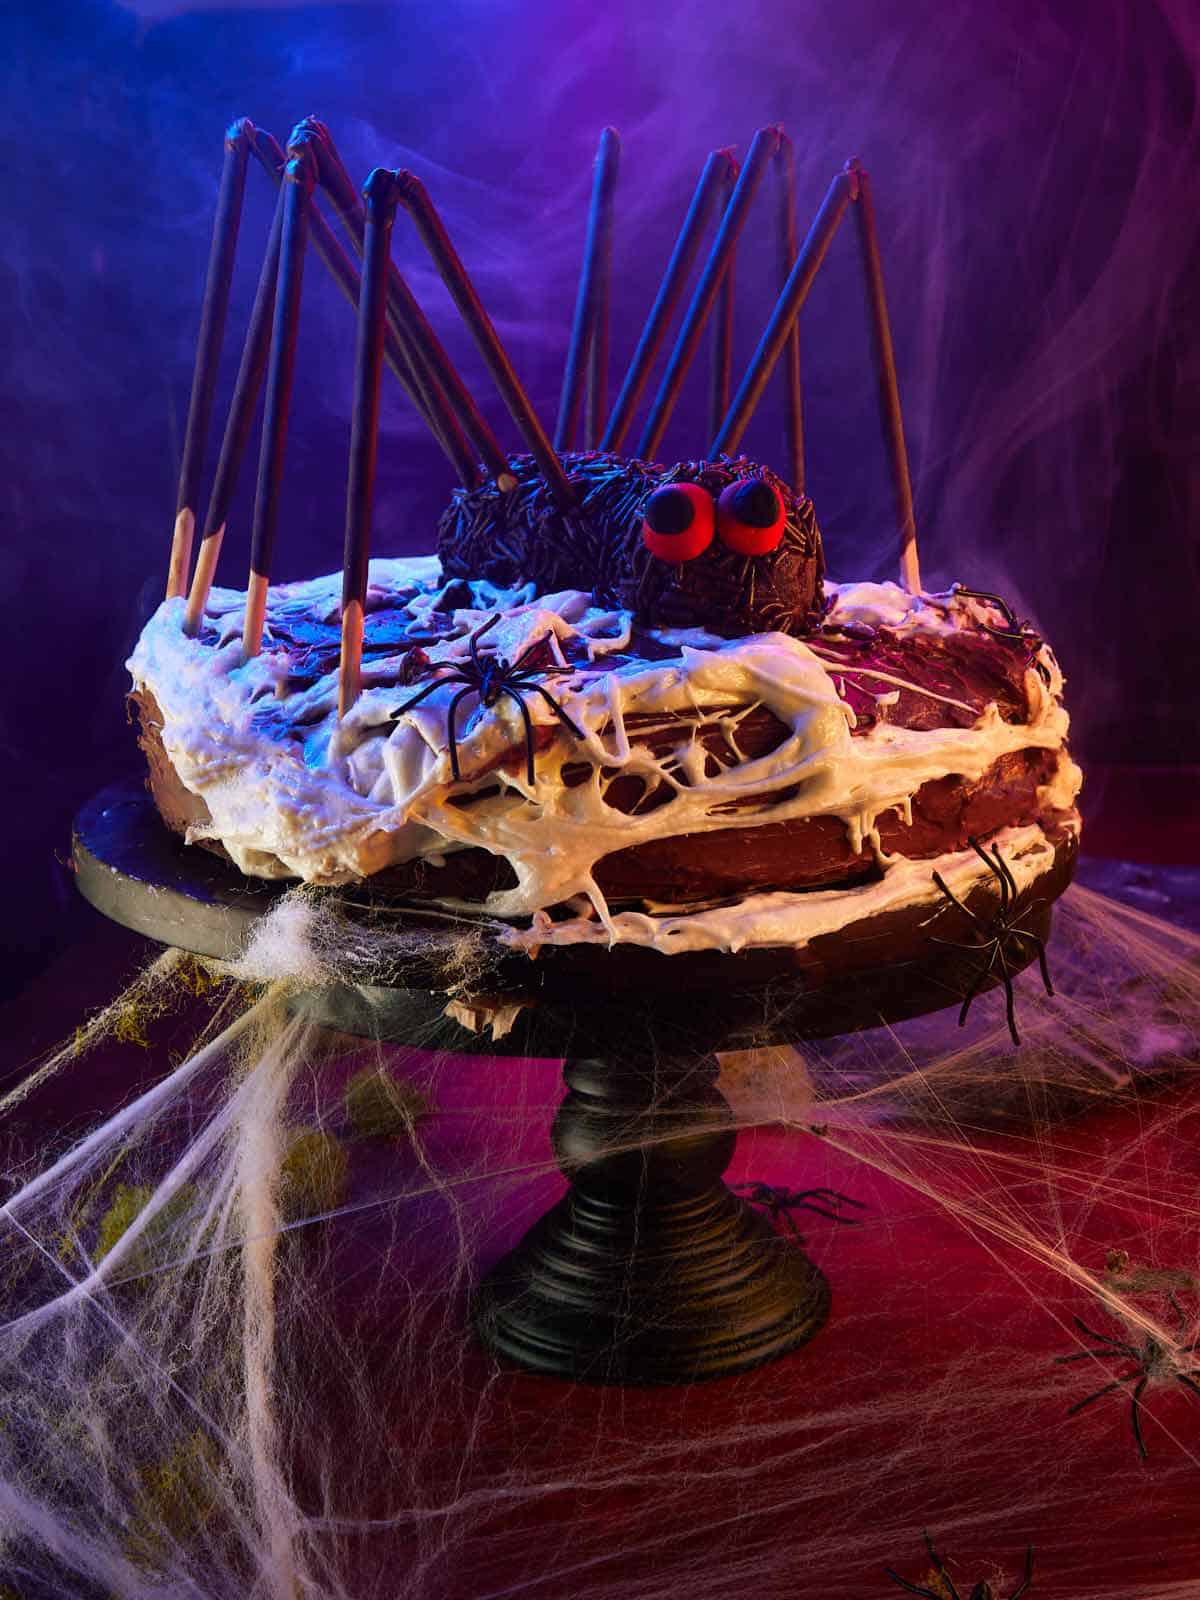
The visual impact is undeniable. The delicate, almost ethereal marshmallow webs stretched across a dark chocolate canvas immediately draw the eye, making it an Instagram-worthy presentation that begs to be photographed. And while it looks incredibly complex, the techniques involved are generally simple enough for most home bakers to master, leading to professional-looking results with minimal stress. This accessibility, combined with the universally loved flavor of chocolate, makes it a crowd-pleasing choice year after year. It's a dessert that invites customization, allowing you to make your spider webs as intricate or as minimalist as your spooky heart desires. Plus, with options for freezing cake layers, it's also a surprisingly make-ahead friendly option, easing the pressure of last-minute Halloween party preparations.
Mastering the Moist Chocolate Layers: Secrets to an Irresistible Base
The foundation of any exceptional chocolate spider layer cake lies in its moist, flavorful chocolate layers. This isn't just about chocolate; it's about achieving that perfect fudgy, tender crumb that melts in your mouth. Several key "secret" ingredients and techniques contribute to this unparalleled moistness and deep flavor:
- The Power of Oil: While butter often reigns supreme in baking, using a neutral-flavored oil like grapeseed, vegetable, or canola oil is a game-changer for moistness. Unlike butter, which is solid at room temperature, oil remains liquid, contributing to a consistently tender crumb that stays moist for days. Grapeseed oil, in particular, is excellent for its neutral profile, allowing the chocolate flavor to truly shine without any competing notes. Avoid olive oil, as its distinct flavor can impact the final taste.
- The Espresso Advantage: This is arguably the most impactful secret ingredient for any chocolate cake. A touch of instant espresso powder doesn't make your cake taste like coffee; instead, it intensely amplifies and deepens the chocolate flavor, making it richer and more profound. It's the ultimate flavor booster that elevates ordinary chocolate into something extraordinary.
- Choosing Your Cocoa Powder: The type of unsweetened cocoa powder you use significantly impacts both the flavor and color of your cake.
- Natural Cocoa Powder: This is the most common type, typically lighter in color and more acidic. It reacts with baking soda to create lift, resulting in a classic chocolate flavor.
- Dutch-Processed (Alkalized) Cocoa: Treated with an alkali, this cocoa has a darker color, a milder, less bitter taste, and a less acidic pH. It's often paired with baking powder for leavening. Hershey's "Special Dark" is a popular example, blending natural and Dutch-processed cocoas for a unique flavor. Dutch-processed cocoa will give you a darker, more intensely chocolate-colored cake.
- Black Cocoa: The darkest of them all, black cocoa is super-alkalized, leading to an almost Oreo-like flavor and an incredibly dramatic, deep black color. While fantastic for visual impact, it can be less intense in chocolate flavor and sometimes requires adjustments to leavening.
- Buttermilk or Sour Cream: The acidity in buttermilk or sour cream not only adds tang and richness but also helps tenderize the gluten in the flour, resulting in a softer, more delicate crumb.
- Ingredient Temperature & Mixing: Ensure all cold ingredients, especially eggs and buttermilk, are at room temperature. This helps them emulsify better, leading to a smoother batter. Mix until just combined; overmixing develops gluten, which can lead to a tough, dry cake.
Crafting the Silky Ganache and Spooky Webs: Building the Character
Once your incredibly moist chocolate layers are baked and cooled, it's time to bring your chocolate spider layer cake to life with its iconic frosting and decorations. This stage is where the magic truly happens, transforming a delicious cake into a dramatic Halloween showstopper.
- The Dreamy Whipped Ganache or Rich Buttercream:
- Whipped Ganache: This is a sophisticated choice, offering a light yet intensely chocolatey and silky smooth texture that melts in your mouth. Made from just chocolate and heavy cream, it's a luxurious complement to the cake layers. To achieve the perfect whipped consistency, ensure your ganache is completely chilled before whipping. It should be firm but pliable, like soft butter.
- Chocolate American Buttercream: A more classic and stable option, chocolate buttercream is known for its rich flavor and ease of spreading. It’s typically made with butter, powdered sugar, cocoa powder, and a liquid (milk or cream). Both options provide a beautiful dark canvas for the webs and spiders, and the choice often comes down to personal preference for texture and sweetness level.
- Mesmerizing Marshmallow Spider Webs: This is the ingenious element that gives the cake its signature spooky look. The process involves melting marshmallows (either in the microwave or a double boiler) until they are soft and gooey. The "secret" to perfect webs lies in letting the melted marshmallow cool slightly until it's sticky but not scalding. Then, using your fingers (lightly oiled to prevent sticking), quickly pull and stretch the marshmallow over the cake, allowing it to form delicate, wispy strands. Work quickly, as the marshmallow cools and becomes harder to manipulate. Don't aim for perfection; the more organic and slightly chaotic the webs, the more realistic they appear.
- The Chocolate Spider: No spider cake is complete without its creepy-crawly centerpiece. You can craft a simple yet effective spider using various methods:
- Fondant: Black fondant can be molded into a body and eight thin legs for a clean, sculpted look.
- Melted Chocolate: Pipe melted dark chocolate onto parchment paper to create a body and legs, then allow to set before carefully placing on the cake.
- Oreo Spiders: A simple and popular method involves using an Oreo cookie for the body and pretzel sticks or licorice laces for the legs, often secured with a dab of frosting.
Elevating Your Spider Cake: Tips for a Bakery-Quality Finish
To truly unlock the secrets of a bakery-quality chocolate spider layer cake, attention to detail and smart planning are essential. These tips will help you achieve a flawless finish and ensure your cake is not only delicious but also visually stunning:
- Level Your Cake Layers: Use a serrated knife or a cake leveling tool to ensure your cake layers are perfectly flat. This creates a stable base and prevents a lopsided cake. A level cake is the first step towards a professional look.
- Crumb Coat First: Before applying your final layer of frosting, apply a thin "crumb coat." This traps any loose crumbs, creating a smooth, clean surface for your final frosting layer and a much neater finish. Chill the cake for 15-20 minutes after the crumb coat to set it.
- Chill Between Steps: Chilling your cake after crumb coating, or after applying each frosting layer, helps firm up the frosting, making it easier to work with and preventing smudges or damage as you add subsequent decorations. This is especially crucial before applying the delicate marshmallow webs.
- Precision with Webs: For the marshmallow webs, work over a large piece of parchment paper or a clean surface to catch any errant strands. Don't be afraid to experiment with how far you stretch the marshmallow to create different web densities. You can even add a few smaller, finer strands around the base of the spider for added realism.
- Make-Ahead Mastery: As mentioned, cake layers can be baked and frozen for up to three months. Wrap them tightly in plastic wrap and then foil to prevent freezer burn. You can also make your ganache a day or two in advance and store it in the refrigerator (re-whip if using whipped ganache). Assembling the cake closer to the event ensures freshness while still allowing for a stress-free experience.
- Consider Edible Eyes: For an extra touch of spooky cuteness on your spider, use small edible candy eyes. They instantly bring the spider to life and add a playful element that guests, especially children, will adore.
- Serve at Room Temperature: For the best flavor and texture, allow your finished chocolate spider layer cake to come to room temperature for about 30-60 minutes before serving. This softens the frosting and cake layers, enhancing their moistness and flavor.
The chocolate spider layer cake is more than just a seasonal novelty; it’s a testament to how simple ingredients, combined with clever techniques, can create something truly spectacular. From the deepest, moist chocolate layers infused with espresso to the dramatic, sticky-sweet marshmallow webs and the watchful chocolate spider, every element works together to deliver a dessert that is both delicious and incredibly fun. By embracing the secrets of quality ingredients, meticulous layering, and creative decorating, you can confidently bake a showstopping Halloween treat that will leave a lasting impression on all who dare to take a bite. So, gather your ingredients, unleash your inner pastry chef, and prepare to enchant your guests with this unforgettable spooky masterpiece!
